
AI Anime Art on a Budget: Where to Save and Where to Spend
When starting a project, it’s usually a matter of exploring a few character concepts, generating some variations, and settling on a design you like. But then come the backgrounds, different poses, corrections, and perhaps even an animated scene. By the time you’re halfway through, you may have used far more credits than expected, with several illustrations still left to finish.
So, where should you actually spend your money?
Creating AI anime art on a budget takes a little planning, especially when you’re working on a project with multiple scenes. Some stages give you plenty of room to experiment for free, while others might deserve a larger share of your credits or access to paid features.
In this guide, I’ll use PixAI to explore how to budget for an anime art project, from early concepts to final illustrations. We’ll look at where costs tend to add up, how to decide which images deserve more resources, and how to leave enough in your budget to actually finish what you started.
Work out what your project will actually cost
It’s tempting to look at your available credits and start generating. But if you’re working on a project with several illustrations, you’ll want a rough idea of how far those credits need to stretch. A little planning can help you avoid running out just when you’re ready to produce your final artwork.
Estimate how many finished images you’ll need
Start with the number of images you actually plan to use. For a short anime story, that might be six illustrated scenes, a character portrait, and a cover image. That’s eight finished images, but you’ll probably generate considerably more before you’re happy with all of them.
Think about which illustrations are likely to need several attempts. A straightforward portrait might come together quickly, while an action scene involving two characters and a detailed background could take much longer.
Account for failed generations and revisions
Even a carefully written prompt can produce an unexpected result. You might get the composition you wanted but discover an issue with the character’s hands, clothing, or expression.
Allow some extra credits for these situations. For example, if you need eight finished illustrations, budget for around 15. Alternatively, you can use PixAI’s batch generation option to get four variations with each prompt. This makes it much cheaper to get options than generating one image at a time.
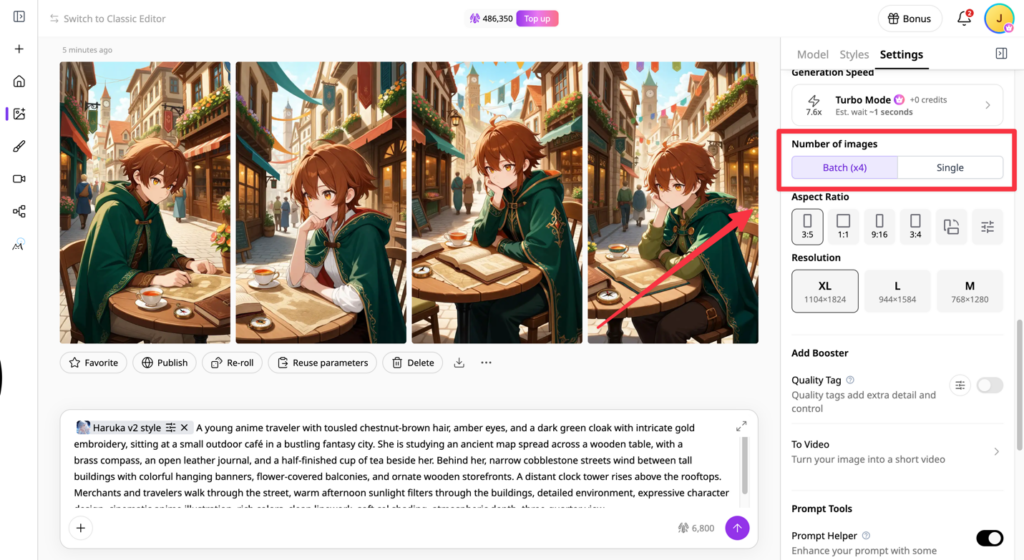
Alt: PixAI image generation settings showing choice between a single image and batch generation
Identify any expensive features you’ll need later
Before using most of your budget on initial artwork, consider what the final stages of your project might require. Higher-resolution output, custom LoRA training, advanced reference tools, and video generation can introduce additional costs.
PixAI displays credit costs for generation tasks, so you can check how different settings affect your spending before generating. If you plan to use a membership-only feature, account for that separately from your credit budget.
Set a limit on the exploration phase
Experimenting is part of the creative process, but it helps to decide how much of your budget you’re willing to spend on it.
Give yourself a budget for experimenting with ideas
Before generating your first batch, decide how many variations you want to explore. You could start with four character concepts, select two promising designs, and generate a few variations of each.
During this phase, it’s good to try different models like Tsubaki.3, Haruka v2, and Hoshino v2. They each bring different visual styles to an illustration and use a varying number of credits.
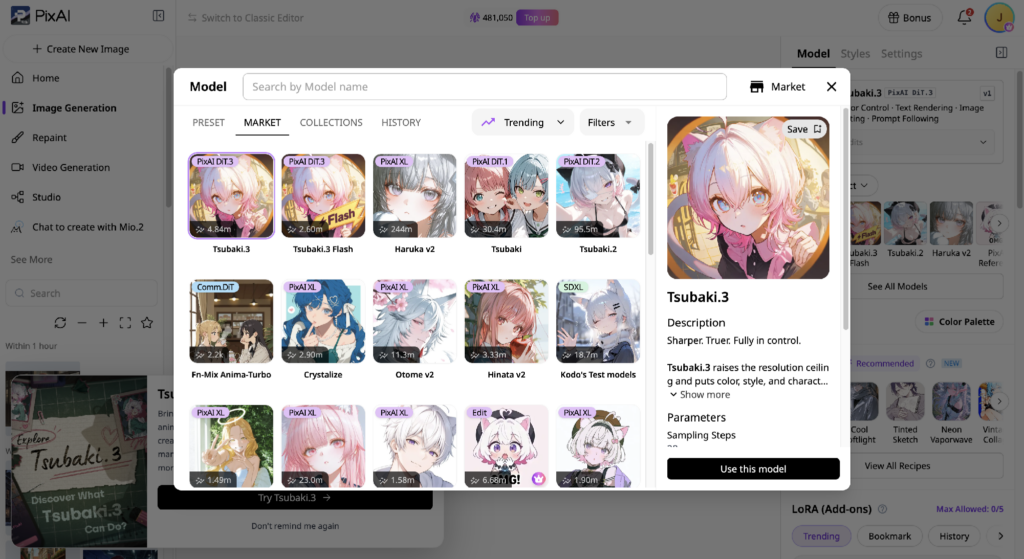
Alt: PixAI interface showing the available image generation models
Establish clear criteria for choosing a final design
After your first few batches, compare the results against what your project actually needs. If you’re creating a recurring character, look for a recognizable face, a manageable outfit, and distinctive features that you can carry into future scenes.
Choose a design you can develop further, then save its prompt and generation settings. It will give you a starting point for the production stage without spending more credits rediscovering a look you already liked.
Know when to stop generating variations
It’s easy to generate one more batch because you’re curious about what else might appear. Before doing that, ask yourself what you’re hoping to improve.
If the character’s appearance, outfit, and overall style already suit your project, you can move on. Save further experimentation for specific problems you encounter while creating the final illustrations. Otherwise, you can always revisit the character.
Allocate your resources according to the importance of each image
Once you’ve settled on a character and visual style, you can start producing the artwork for your project. But every illustration doesn’t need the same amount of attention or resources.
Identify your project’s most demanding illustrations
Look through your planned scenes and identify the ones likely to take the most work. Complex character poses, multiple characters interacting, detailed environments, and unusual camera angles may require several attempts before you get a usable result.
Ideally, give the cover image and the most important story scene a larger share of the generation budget. Simpler illustrations, such as a character standing in a familiar location, can have a smaller allowance.
Use different generation settings for different purposes
PixAI lets you adjust generation settings, including image dimensions, resolution, and number of images. The settings you choose usually affect how many credits you spend, so there’s little reason to use the same configuration for every stage.
For early compositions, you might generate several variations at a modest resolution to compare different arrangements. Once you’ve chosen the version you want to develop, you can produce a more detailed illustration using settings appropriate for its final use.
Decide where premium features will make a difference
Some projects have requirements that justify spending more on specific features. For example, if you’re creating a long-running webcomic with the same original character appearing in dozens of scenes, PixAI’s custom LoRA training could help you maintain their appearance without repeatedly rebuilding the design through prompts.
Reference Pro is another option when you need to place an established character in new environments, change their outfit, or experiment with different poses while preserving recognizable details.
And if you’re planning to turn your illustrations into an animated short, PixAI’s video generation tools may deserve a place in your budget. You could start by animating one important scene before deciding whether to produce additional clips.
Decide whether to repair, regenerate, or accept an image
You’ve generated an illustration that looks almost right, but there’s a problem with one of the details. Should you spend more credits fixing it, generate a completely new version, or leave it as it is?
The answer depends on how noticeable the problem is, what you plan to do with the image, and how much of your budget you’re willing to spend correcting it.
Compare the cost of editing with another generation
Imagine you’ve created a detailed illustration of your character sitting in a café. The composition, expression, and background look great, but the character has an extra finger.
You could generate the entire scene again, although there’s no guarantee the next result will preserve everything you liked about the original. Alternatively, you could use PixAI’s inpainting feature to select the problematic hand and regenerate that area.
As you can see below, the editing credits in PixAI are much cheaper compared to new generations.
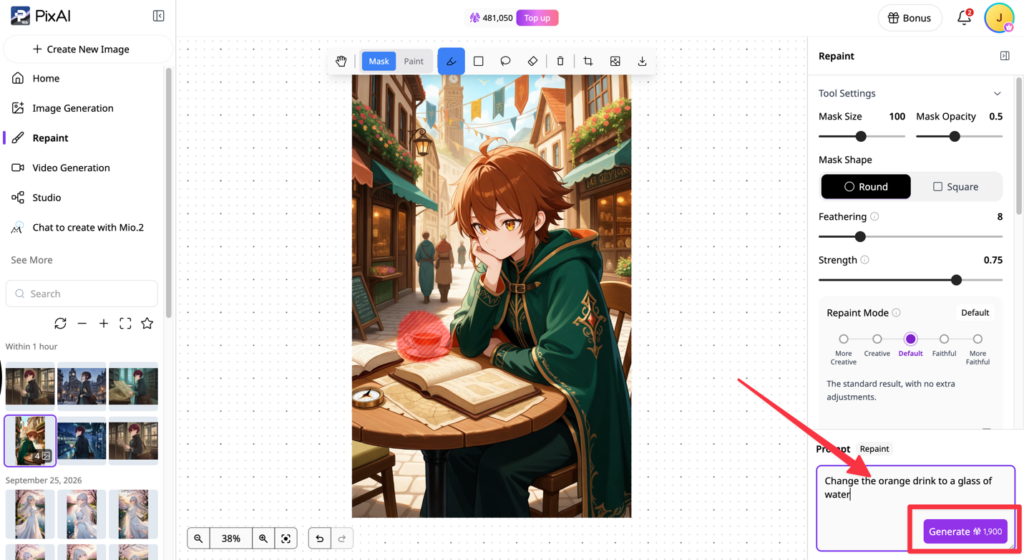
Alt: PixAI Repaint interface highlighting the fewer clicks needed to edit an image rather than regenerate
Screenshot: The original illustration beside its inpainted version, with the credit cost of the correction noted in the caption.
Set reasonable limits on repeated corrections
Sometimes an edit creates another problem, and fixing that problem introduces a third. Before you know it, you’ve spent more credits correcting an image than you originally spent generating it.
I’d give myself a limit of two or three attempts to fix a particular detail. If the problem persists, I’d reconsider the original image or try a different approach.
You can also save promising versions as you work. That way, if a later correction makes the illustration worse, you can return to an earlier result without having to recreate it.
Recognize when an imperfection doesn’t affect the final result
An illustration intended for a full-page print deserves closer inspection than a small image appearing briefly in an animated sequence. Think about how the artwork will actually be viewed before spending more credits on minor details.
Avoid spending your entire budget before the project is finished
By this stage, you might have most of your illustrations ready, but there are probably still a few scenes to finish and details to correct. It’s worth checking how many credits and ensuring you leave a little room in your budget for final generations, unexpected revisions, and any extras you want to try can make a big difference when you’re close to finishing your project.
Reserve credits for your final images
It’s easy to spend more than planned on an illustration you’re particularly excited about. But if you have three scenes left to generate, those credits might be more useful elsewhere.
I’d set aside enough resources to complete every planned image before spending extra on polishing individual scenes. You can estimate this amount using the generation settings and average number of attempts you’ve already recorded.
PixAI displays the credit cost of a generation before you submit it, so you can use that information to plan your remaining work. If your balance is getting low, prioritize the illustrations you still need rather than producing additional variations of images you’ve already finished.
Decide which optional features can wait
As your project develops, you’ll probably think of a few additions that weren’t part of the original plan. Perhaps an illustration would look great as an animated clip, or you’d like to experiment with a different premium model.
Before spending more, consider whether the extra feature contributes to the project you’re currently trying to finish.
If you’re producing an illustrated story, complete the essential scenes first. You can return to PixAI’s video generation tools later and animate your favorite moment once you know how much of your budget remains.
You might even discover that your finished illustrations work perfectly well on their own. And if you do decide to invest in animation, you’ll have a completed project to build on rather than another unfinished experiment.
Where PixAI fits in
PixAI can serve as your main creation platform throughout the project, giving you a way to manage generation costs while keeping your artwork and creative tools in one place. You can start with free generation for early concepts, adjust your settings as you develop your illustrations, and decide whether additional features are worth paying for once you know what your project needs.
For example, batch generation lets you compare several ideas at once, while inpainting gives you the option to correct individual details in an otherwise successful image. If you’re creating a longer series, Reference Pro or custom LoRA training may justify the additional expense by helping you maintain character consistency. Video generation is another option if animation is part of your plans.
I’d start by testing your usual generation settings and recording how many credits it takes to produce a finished illustration. Then explore the additional features that could improve your particular workflow. You may find that a combination of free generation and selective spending gives you everything you need while staying within budget.
Final thoughts
Creating AI anime art on a budget takes a little planning, especially when a project involves multiple characters, scenes, and revisions. Give yourself room to experiment early on, but keep enough resources available for the illustrations that will make it into your finished project.
PixAI gives you several ways to manage that process, from adjusting generation settings to making targeted edits and exploring premium features when your project calls for them. Pay attention to which tools you actually use and how much each finished illustration costs.
As you complete more projects, you’ll get a better sense of where your money makes a difference and where you can comfortably spend less. That experience will help you plan your next project with a more realistic budget and fewer unexpected expenses.


